Changing Skin in Minecraft: A Comprehensive Guide

Minecraft is a world brimming with creativity, exploration, and customization. One of the most enjoyable ways to express your personality in this virtual sandbox is by changing your character’s skin. Whether you’re looking to embody a favorite character, create something entirely unique, or simply add a personal touch to your gameplay, changing skins allows you to stand out in a world where everyone starts with the same default appearance.
In this article, we’ll dive into the mechanics of Minecraft skins, how to change them, where to find them, and how to create your own unique skin. By the end of this guide, you’ll be fully equipped to customize your avatar and step into the game with a fresh look.
What Are Minecraft Skins?
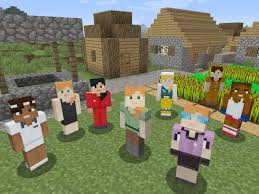
Before we get into how to change your skin, it’s important to understand what skins are in Minecraft. In the game, a “skin” is the texture that is applied to the 3D model of your player character. The skin determines the outward appearance of your Minecraft avatar. These textures are essentially images made up of pixels that wrap around the body of the player character. Players can either use default skins, select skins from an online repository, or even create their own skins from scratch.
Minecraft skins are primarily used for aesthetic purposes, meaning they do not affect gameplay or mechanics. The only impact they have is visual, offering an opportunity to express creativity. Skins in Minecraft come in a variety of styles, including but not limited to:
- Classic Skins: These follow the traditional humanoid style with a square head, arms, and body.
- Custom Skins: Players can design their own skins, ranging from simplistic designs to complex, detailed works of art.
- Themed Skins: Many players use skins inspired by characters from pop culture, such as superheroes, anime characters, or video game characters.
Why Change Your Skin in Minecraft?
Changing your skin allows you to stand out from the crowd. Minecraft, though a game of blocks and pixelated textures, is an environment where players express themselves. Custom skins provide a fun way to personalize your experience and show off your creativity.
Some reasons you might want to change your skin include:
- Personal Expression: You may want to represent your personality or identity, whether it’s through an original design or a favorite character.
- Making Friends or Joining Communities: Many Minecraft communities or servers have themed events, and a unique skin can help you fit in or make new friends.
- Having Fun: Sometimes, the best reason to change your skin is just to try something new and have fun. Minecraft is all about having a good time, and customizing your avatar is an easy way to do that.
How to Change Your Skin in Minecraft
Now that we understand the importance of skins in Minecraft, let’s walk through the steps on how to change your skin.
Step 1: Download a Skin
If you don’t want to create your own skin, the easiest way to change your Minecraft skin is by downloading one from the internet. There are countless skin websites where you can find free Minecraft skins, including:
- The Official Minecraft Website: Minecraft.net offers a wide selection of skins. The skin database includes community submissions, offering a large variety of skins from animals to pop culture characters.
- Planet Minecraft: Planet Minecraft is a fan-driven website where you can download skins designed by other players. The site has a vast collection of skins for every style imaginable.
- Skindex: Another popular site for downloading Minecraft skins. The Skindex offers an easy-to-use interface to browse, upload, and download skins.
To download a skin, follow these steps:
- Visit one of the websites mentioned above.
- Browse through the available skins and find one you like.
- Click on the download button, and the skin will be saved to your computer as a PNG file.
Step 2: Log Into Minecraft
Once you’ve downloaded your desired skin, open Minecraft and log into your account. This can be done through the Minecraft Launcher on either the desktop version or the Bedrock Edition (for consoles or mobile).
Step 3: Upload Your Skin
Once you’re logged in, follow these steps to upload your skin:
- Java Edition:
- Visit the Minecraft website at
 and log in.
 - Go to your profile by clicking on your username in the top-right corner.
- Scroll down to the “Skin” section and click on the “Browse” button.
- Select the PNG file that you downloaded earlier.
- Choose the model you want to use: either the “slim” model (a more narrow frame) or the default model (the classic humanoid body shape).
- Click “Save” to apply your skin.
- Visit the Minecraft website at
- Bedrock Edition (Mobile, Consoles, and Windows 10):
- Open Minecraft and tap or click on the hanger icon on the main menu (this is the “Profile” section).
- Tap the “Edit Character” option.
- Tap on the “Owned” tab and then select “Choose New Skin.”
- Select the downloaded skin from your file browser and apply it to your character.
Once these steps are completed, your new skin will appear on your Minecraft avatar.
Step 4: Play Minecraft with Your New Skin
After applying your new skin, simply enter the game, and your character will reflect the skin you’ve chosen. If you’re on a multiplayer server, your friends and fellow players will also see your new look.
Creating Your Own Minecraft Skin
If you’re feeling particularly creative, you may want to design your own skin rather than download one. Creating a Minecraft skin allows you to make something truly unique to your personal style. Here’s how to go about it:
Step 1: Use a Skin Editor
There are various tools available to create your own Minecraft skin. Some of the most popular editors include:
- Minecraft Skin Editor by The Skindex: This online tool lets you design your own Minecraft skin using a simple grid layout. You can paint each pixel individually or use pre-set tools for coloring. Once done, you can save the skin and apply it to your Minecraft profile.
- MCSkin3D: This is a more advanced, downloadable editor for creating detailed skins. MCSkin3D allows you to work with 3D models of your Minecraft character, giving you a better perspective on how the skin will look in-game.
Step 2: Design Your Skin
When designing your skin, you will be working with a 64×64 grid of pixels (the default for most skins). The skin is divided into different body parts, including:
- Head: The top part of the grid represents the head.
- Body: The central sections of the grid correspond to the torso and arms.
- Legs: The bottom parts of the grid represent the character’s legs.
Be mindful of how the skin wraps around the body. You’ll want to make sure that patterns and designs are aligned properly to create a coherent and appealing appearance. Skin editors often allow you to preview how your design will look in 3D, which can help you see if anything looks out of place.
Step 3: Save and Upload Your Skin
Once you’re satisfied with your skin design, save the PNG file to your computer. Afterward, follow the same steps as before to upload the skin through your Minecraft profile or game settings.
Tips for Customizing Your Skin
- Use High-Quality Skins: Ensure the skin has good pixel resolution for a sharp look. Minecraft’s pixelated style can sometimes make details difficult to see if the skin is too small or blurry.
- Stay True to the Theme: If you’re creating a skin based on a character or theme, make sure the design reflects that theme clearly. For example, if you’re designing a superhero skin, use recognizable colors and symbols.
- Experiment with Layers: Many skin editors allow you to create different layers for clothing, accessories, and details. Experiment with layering to add depth and complexity to your design.
- Test in 3D: Always test your skin in 3D to ensure that it looks good from all angles. This is particularly important if you have detailed textures on the back or sides of the character.
Conclusion
Changing your skin in Minecraft is one of the most enjoyable ways to customize your character and add a personal touch to your gameplay. Whether you’re downloading a skin from a website or designing your own masterpiece, the process is simple and fun. Minecraft’s vast community of skin creators also ensures that you’ll never run out of fresh designs, while the option to create your own skin gives you limitless possibilities for expression.


